| Version 24 (modified by , 13 years ago) ( diff ) |
|---|
Amazon EC2
Amazon's Cloud provides a flexible platform to deploy Eden scalably.
The costs aren't fixed & can be difficult to predict, despite their calculator, but are competitive, especially in Singapore, which is a good base for the Asia Pacific region.
Regions & Zones
Amazon supports multiple Regions in order to provide a service closest to your users.
- Namespaces of Instances, Volumnes & Snapshots are unique only within a Region.
- Within each Region, there are a couple of Availability Zones to allow spreading the risk across different facilities.
- Volumes are located within a specific Availability Zone
- Bandwidth transfers are free within an Availability Zone
Instance Size
- The free starter 'micro' instance is flexible as it can run both 32-bit & 64-bit Operating Systems.
- The normal production 'small' instance can only run 32-bit.
- Larger production instances can only run 64-bit, so can't have the exact same image used.
- The community Debian Squeeze AMI seems a fine base & attached scripts turn this into an Eden instance
Instance Persistence
- EBS-backed instances have persistent storage even whilst powered down, which is very useful.
- For DB I/O performance increase can stripe multiple EBS
- monitoring data available to see if this is the issue
- For DB I/O performance increase can stripe multiple EBS
- Each time you start an instance up, it will be assigned a new IP ('Public DNS') although this can be overcome using an Elastic IP
- Remember to set up Reverse DNS for your Elastic IP to be able to send emails reliably: https://aws-portal.amazon.com/gp/aws/html-forms-controller/contactus/ec2-email-limit-rdns-request
Authentication
SSH
This can provide an early stumbling block.
- Each instance created needs to start with a unique SSH keypair
- When setting up an instance, be sure to safely download the private key.
- In order to get the public key (needed by SecureCRT for instance) then you need to login using CLI & retrieve it:
ssh -l root -i private.pem <hostname>
cat ~/.ssh/authorized_keys
SecureCRT needs the private key storing as <filename> & the public as <filename.pub> (all on one line)
SSH will also need to be enabled in your Firewall policy (restrict the IP source, if possible)
Using Sahana Eden prebuilt AMIs
You will find a prebuilt instance of Sahana Eden in some zones [Current us-west], that can help you in quickly setting up an instance.
- Search for "Sahana Eden" in the AMI's section.
- Launch the instance.
- SSH into the instance by following the steps mentioned in the section above.
- run configure-eden-cherokee-postgis.sh to configure the instance.
./configure-eden-cherokee-postgis.sh
- The disk space on the pre-built AMIs is 1GB - Instructions to grow the disk are given below.
- You can add swap from a swap file :
dd if=/dev/zero of=/swapfile1 bs=1024 count=524288

mkswap /swapfile1
chown root:root /swapfile1
chmod 0600 /swapfile1
swapon /swapfile1
Make this persistent across reboots by adding the following to your /etc/fstab
/swapfile1 swap swap defaults 0 0
Building AMIs for easier deployment
This will ease deployment for others.
- Choose a debian AMI in your desired ZONE with 1 GB of EBS storage [This enables AMI registration in AWS free tier.]
- Launch the instance.
- Copy the installation and configuration scripts -> install-eden-cherokee-postgis.sh and configure-eden-cherokee-postgis.sh into the launched instance.
wget http://eden.sahanafoundation.org/raw-attachment/wiki/InstallationGuidelines/Linux/Server/CherokeePostgreSQL/install-eden-cherokee-postgis.sh
chmod a+x install-eden-cherokee-postgis.sh
wget http://eden.sahanafoundation.org/raw-attachment/wiki/InstallationGuidelines/Linux/Server/CherokeePostgreSQL/configure-eden-cherokee-postgis.sh
chmod a+x configure-eden-cherokee-postgis.sh
- Run the install-eden-cherokee-postgis.sh script and delete it. [Note: This step takes about 10min - grab a coffee]
./install-eden-cherokee-postgis.sh
rm install-eden-cherokee-postgis.sh
- Shutdown the EBS instance.
shutdown -h now
- Go to your aws console for the current region at | EC2 Console
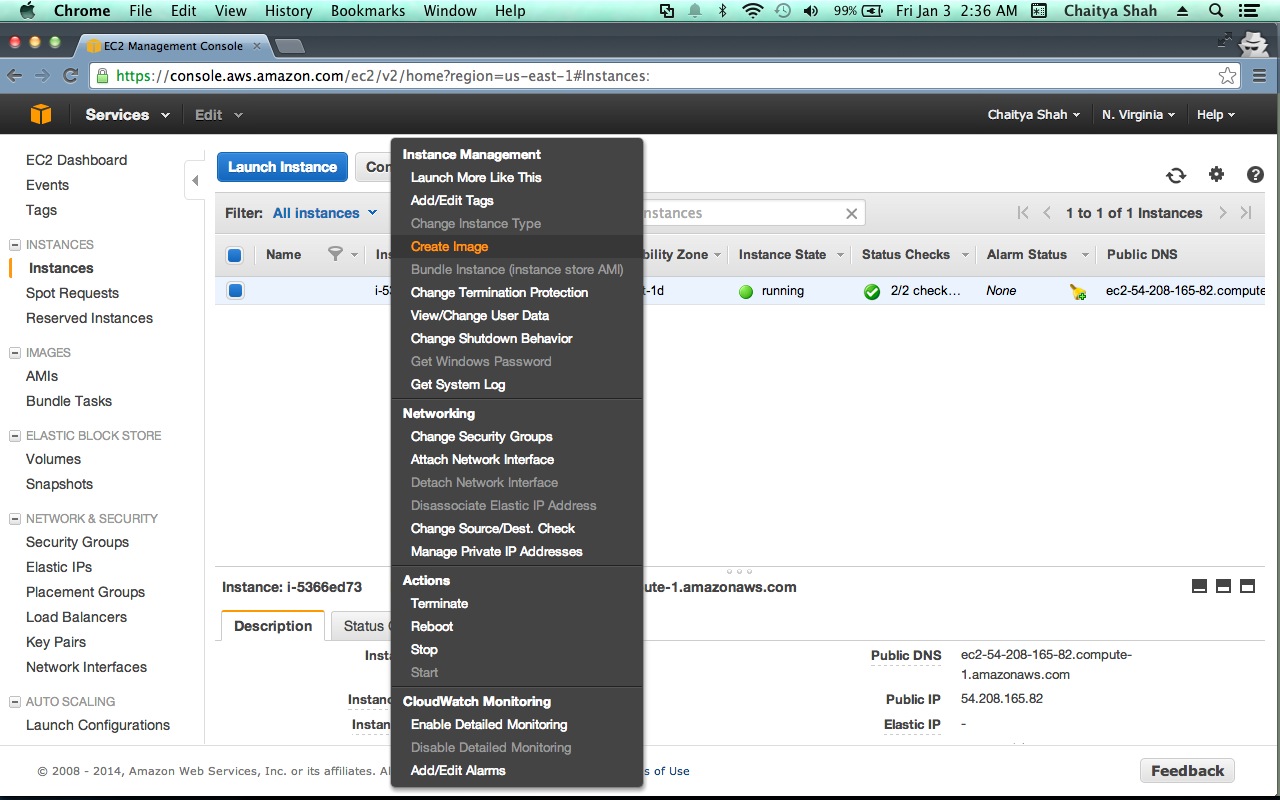
- Select the debian instance you just prepared in the "Instances"
- Select " Create Image (EBS AMI) " in the "Instance Actions" drop down.
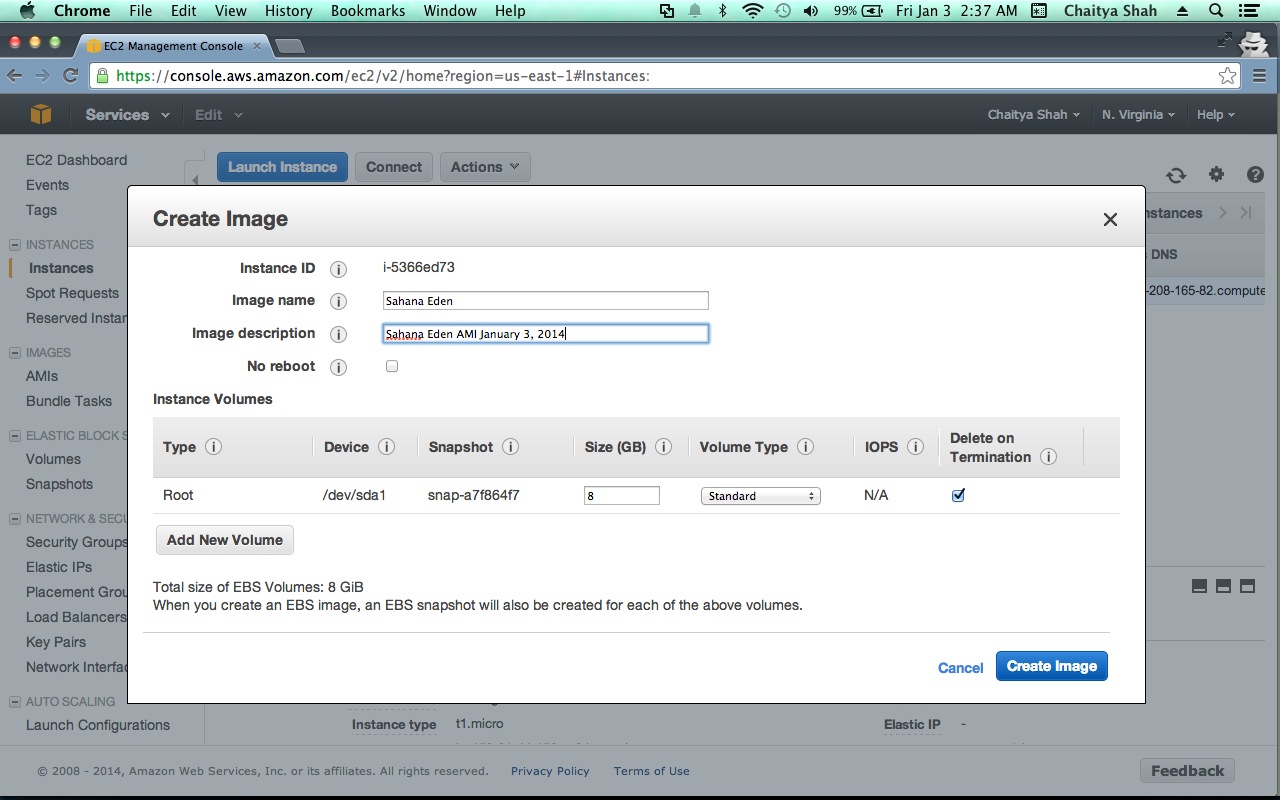
- Choose a Image name - Lets say - "Sahana Eden" and fill in a description.
- Click "Create this Image"
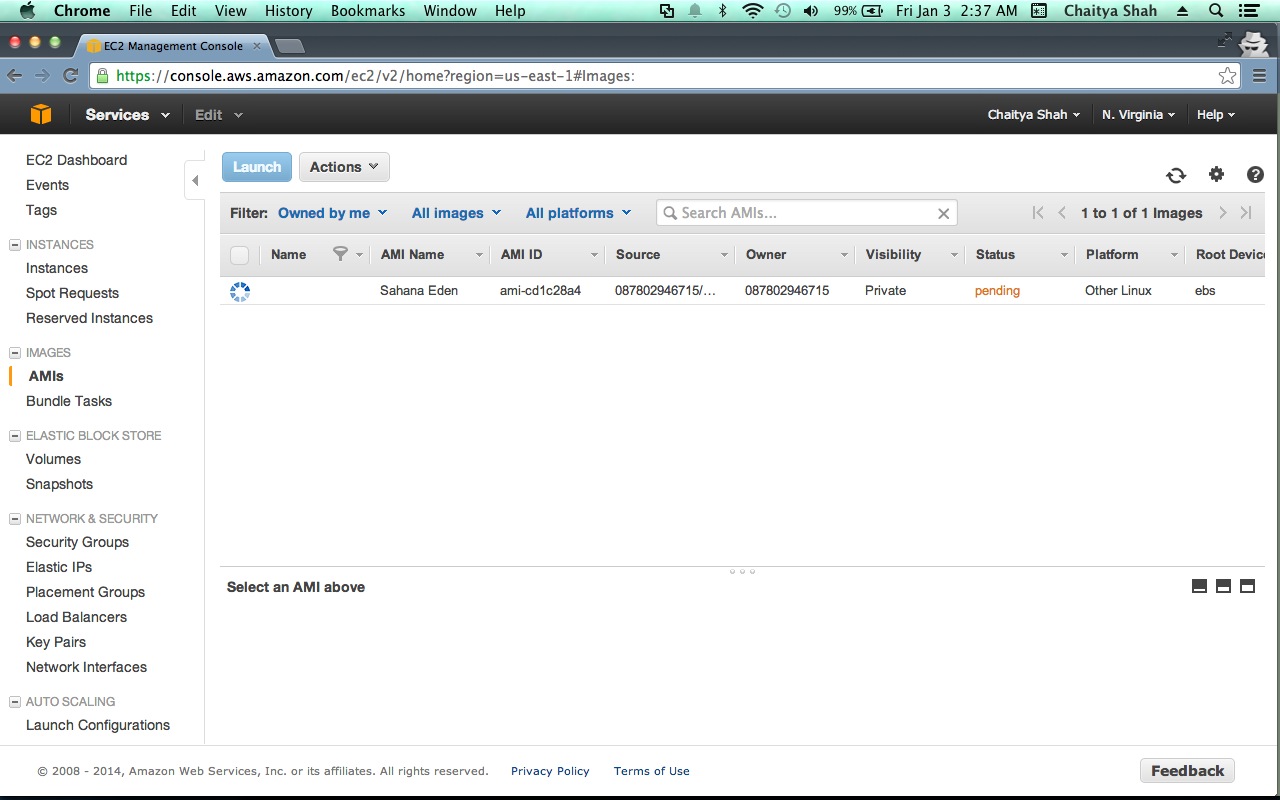
- Go to the "AMIS" menu and select "Owned by me" and "All Platforms" in the Viewing dropdown.
- Wait for about 5 minutes and hit refresh for the AMI you just built to appear.
- Select the AMI and click the Permissions button - Select public, to make the image public.
CLI
To use any of the AWS CLI tools on your own machine to remotely manage instances, then you need to generate a unique X.509 Certificate per account. This can be done from the 'Security Credentials' page within your account.
CLI Management
There are extensive CLI tools available to manipulate your instances.
- Java CLI for Windows/Linux
- Python: http://libcloud.apache.org
Growing Storage
1Gb EBS is too small for Eden - need to grow to 3Gb
# --region ap-southeast-1
set EC2_URL=https://ec2.ap-southeast-1.amazonaws.com
set ZONE=ap-southeast-1b
set DEV=i-9546edc0
# Stop Host
ec2stop %DEV%
# Create a snapshot
ec2-create-snapshot vol-e189e88c
# Create new volume from snapshot
ec2-create-volume -z %ZONE% --size 3 --snapshot snap-63f89d08
# Delete Snapshot (if no data in yet)
ec2-delete-snapshot snap-63f89d08
# Attach new volume as secondary
ec2-attach-volume -i %DEV% vol-a9c2a3c4 -d /dev/sdb1
# Start Host
ec2start %DEV%
ec2-describe-instances
# Login (Remember different IP!)
mkdir /mnt/data
echo '/dev/xvdb1 /mnt/data ext3 defaults,noatime 0 0' >> /etc/fstab
mount /mnt/data
resize2fs /dev/xvdb1
umount /mnt/data
# Stop Host
ec2stop i-c75af292
# Unattach volumes
ec2-detach-volume -i %DEV% vol-e189e88c
ec2-detach-volume -i %DEV% vol-a9c2a3c4
# Delete old volume
ec2-delete-volume vol-e189e88c
# Attach volume as boot
ec2-attach-volume -i %DEV% vol-a9c2a3c4 -d /dev/sda1
# Attach old volume for /var/log
ec2-attach-volume -i %DEV% vol-e189e88c -d /dev/sdb1
# Start Host
ec2start %DEV%
ec2-describe-instances
# Login (Remember different IP!)
df -h
# Use the old partition for /var/log (to avoid DoS)
mv /var/log /var/log_old
vim /etc/fstab
/dev/xvdb1 /var/log  ext3    noatime 0 0

mount /var/log
mv /var/log_old/* /var/log
rm -rf /var/log_old
Keep Templates as EBS Volumes as this is cheaper than Snapshots
Attachments (14)
- ami-built.png (156.9 KB ) - added by 12 years ago.
- ami-permissions.2.png (176.1 KB ) - added by 12 years ago.
-
orig-ami-built.png
(172.9 KB
) - added by 12 years ago.
lifeeth's original ami-built.png from 2 years ago
-
orig-create-image.png
(271.0 KB
) - added by 12 years ago.
lifeeth's original create-image.png from 2 years ago
-
orig-ami-permissions.png
(215.7 KB
) - added by 12 years ago.
lifeeth's original ami-permissions.png from 2 years ago
-
orig-create-image-config.png
(270.8 KB
) - added by 12 years ago.
lifeeth's original create-image-config.png from 2 years ago
- create-image-config.png (184.8 KB ) - added by 12 years ago.
- create-image.png (211.0 KB ) - added by 12 years ago.
- Dashboard.png (103.7 KB ) - added by 11 years ago.
- SelectAMI.png (94.4 KB ) - added by 11 years ago.
- SecurityGroup.png (70.1 KB ) - added by 11 years ago.
- UserData.png (59.3 KB ) - added by 11 years ago.
-
select_debian.png
(68.2 KB
) - added by 9 years ago.
selct debian OS
-
select_region.png
(12.8 KB
) - added by 9 years ago.
select region


