
| Version 9 (modified by , 13 years ago) ( diff ) |
|---|
EDEN DOCUMENT WORKFLOW FOR “ADD A VOLUNTEER”
INTRODUCTION
This Eden Document Workflow is a simple guide to the process of adding recruited volunteers to the database system. This guide is aimed for use by system administrators who have the responsibility of updating new volunteers into the computer system on a regular basis.
DETAILS
Registration Overview
1.Select the Volunteers option on the Sahana Eden Humanitarian Platform view image This will open the Sahana Home Page.
2.On the left hand pane select new under the volunteer tab view image
This displays a list of empty fields which require to be filled. They are grouped into various categories depending on the data type required.
As many fields as possible should be filled.
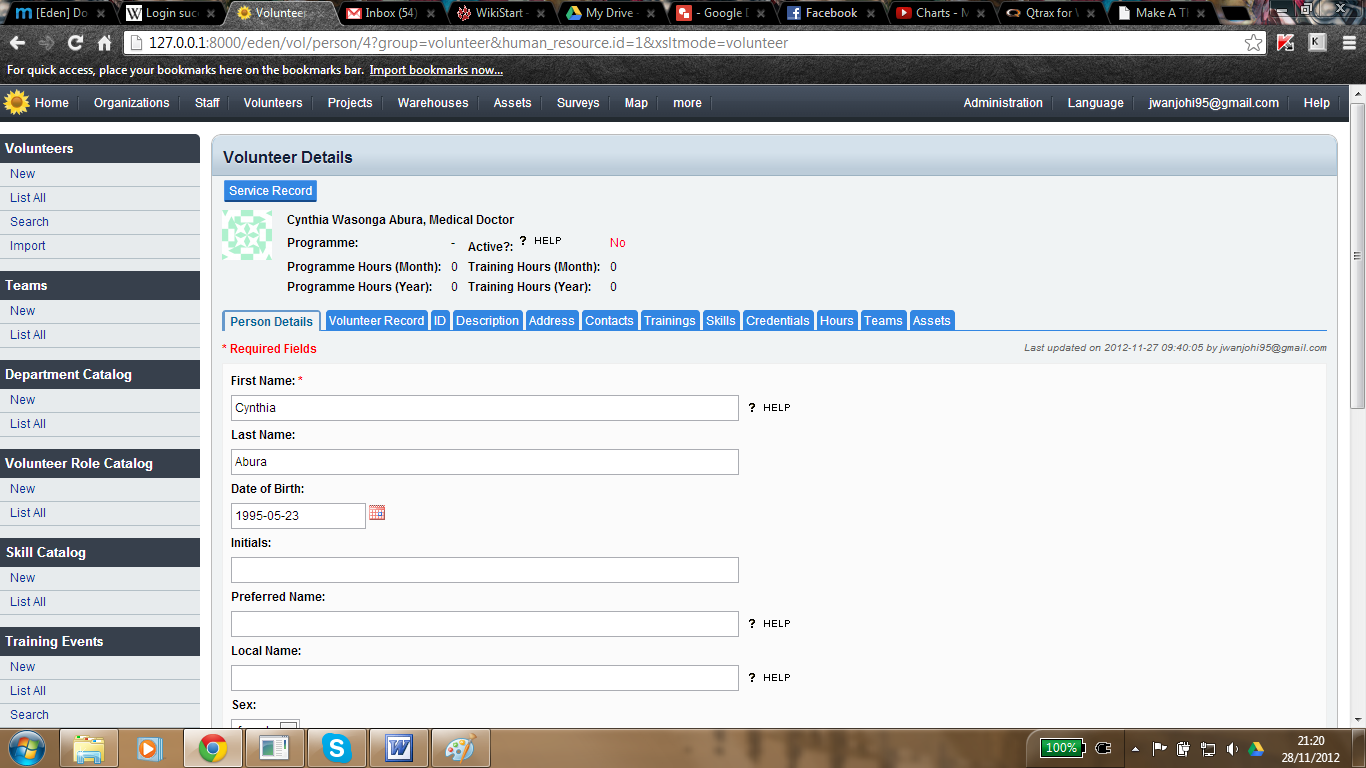
Personal details view image
-First Name -Last Name -Date of Birth -Initials -Preferred Name -Local Name -Sex -Marital Status -Nationality -Religion -Name of Mother -Name of Father -Normal Job -Company -Affiliations -Comments
Volunteer Records view image
-Organisation -Programme -Volunteer Role -Volunteer Cluster Type -Volunteer Cluster -Volunteer Cluster Position -Start Date -End Date -Status
Identity view image
-ID -ID type -Number -Valid From -Valid Until -Description -Country Code -Issuing Authority -Comments
Description view image
-Description -Ethnicity -Blood Type -Other Details
(note) Remember to SAVE your entries at EACH stage to avoid loss of data.
You have successfully added a new volunteer to the Sahana System Volunteer Database.
See Also:Workflow
Workflow guideline to add volunteer’s education and trainings
Introduction
This sub-module aims to help user to learn how to add education and trainings details of a volunteer. Do ensure that a Volunteer has been already created before following this set of workflow.
Workflow
Firstly, if you have yet to create a volunteer, click on Add Volunteer and fill in your volunteer detail accordingly. If you already have a volunteer, you can skip this step.
Add Volunteer
After having at least one volunteer, click on Open.
Open
You should be redirected to this page. The areas which we are focusing on are circled in the image.
Redirected page
In this module,we will be focusing on these three areas.
1) Add Volunteer’s training
2) Add Volunteer’s Skills
3) Add Volunteer’s Credentials
Part 1: Volunteer’s training
Now, click on training. On this page, fill in the training event which your volunteer has underwent and grade him a pass or a fail and click Save to the save the record. Adding Volunteer's training
Part 2: Volunteer’s skills
Now, click on skills. On this page, fill in the skills which your volunteer possess. Select the competency level and click Save. Adding Volunteer's skills
Part 3: Add Volunteer’s Credentials
Now, click on credentials and fill in accordingly. Then, save it. Adding Volunteer's Credentials
Conclusion
With this, you have successfully added your volunteer’s education and trainings.
See Also:Workflow
[EDEN] DOCUMENT WORKFLOW FOR “ADD VOLUNTEER ADDRESS AND CONTACT DETAILS”
INTRODUCTION
This is a documentation showing the workflow for adding a volunteer address and contact details on the Sahana Eden Humanitarian Management platform. Through this, you can easily be guided on how to easily view, edit and update your contact details.
DETAILS
1.Using pre-existing volunteers, you can search for the volunteer by inserting their name in the search box. If the volunteer exists in the database memory, the search result is successful.View Image
2.The name of the volunteer appears with their personal details. Click on the tab ‘Open’ which enables you to edit or change these details. View Image
3.After clicking the tab ‘Open’, a new window is opened containing fields to be filled in by the administrator.View Image
4.Next, click on the tab ‘Address’.View Image
5.In the ‘Address Type’ field, select whether your address is a ‘current home address’, ‘permanent home address’, ‘office address’ or ‘other address’.ViewImage
6.Under the ‘Location field’, you can choose to create a location or select from an existing location.View Image
7.If creating a new location, choose your country from the drop-down list.
.Type the location’s building name, street address and the postcode.
.In the next fields, type in the state/province, county/district, city/town/village and village/suburb. Enter some characters to bring up a list of possible matches. If not found, you can have a new location created.
.Under the ‘Latitude’ and ‘Longitude’ fields, you are required to enter the degree specifics of your location by clicking on the tab ‘Place Map’. A “cross” appears which helps you to point on your location on the world map.
Note:The longitude and latitude points can either be in [degree, minutes and seconds] or [decimal].
.In the ‘Comments’ field, you can record any additional information including the history of the record if it is updated. Ensure that you save your record by clicking ‘Save’.Image
8.If selecting from existing locations, enter some characters in the search box to bring a possible list of matches.View Image
9.In the ‘Comments’ field, you can record any additional information including the history of the record if it is updated.View Image
10.Click on the tab ‘Contacts’.View Image
11.Click ‘Add’.View Image
12.In the ‘Contact Method’ field, choose from the drop-down list for example, Facebook.View Image
13.In the ‘Value’ field, give the contact method its value ranging from 1-9.
14.In the ‘Priority’ field, give the order to be contacted in.
15.In the ‘Comment’ field, give any additional information including the history of the record if it is updated.View Image
16.Click the button ‘Save’.View Image
17.Under the ‘Mobile Phone’ and ‘Email’ fields, you can delete, edit or add information of the volunteer.View Image
18.Under the ‘Emergency Contacts’ field, you can add your name, relationship, phone number and comment on any additional information including the history of the record if it is updated.View Image
19.Click the button ‘Save’.View Image
Conclusion
With this, you have successfully added the volunteer's address and contact details to the Sahana Eden Humanitarian Management Platform.
Refer to:Workflow
Attachments (18)
- volunteers- open.png (189.5 KB ) - added by 13 years ago.
- volunteer personal details.png (190.9 KB ) - added by 13 years ago.
- vol. address.png (190.9 KB ) - added by 13 years ago.
- create new location.png (177.2 KB ) - added by 13 years ago.
- Select existing Location.png (171.3 KB ) - added by 13 years ago.
- volunteer contacts.png (195.4 KB ) - added by 13 years ago.
- contacts- add.png (194.3 KB ) - added by 13 years ago.
- emergency contacts.png (174.0 KB ) - added by 13 years ago.
- volunteers.png (251.4 KB ) - added by 13 years ago.
- volunteers 1.png (89.6 KB ) - added by 13 years ago.
- volunteers- open 1.png (120.2 KB ) - added by 13 years ago.
- volunteer personal details 1.png (127.3 KB ) - added by 13 years ago.
- vol. address 1.png (127.6 KB ) - added by 13 years ago.
- create new location 1.png (108.0 KB ) - added by 13 years ago.
- Select existing Location 1.png (100.0 KB ) - added by 13 years ago.
- volunteer contacts 1.png (130.9 KB ) - added by 13 years ago.
- contacts- add 1.png (127.2 KB ) - added by 13 years ago.
- emergency contacts 1.png (100.8 KB ) - added by 13 years ago.
