| Version 42 (modified by , 13 years ago) ( diff ) |
|---|
Amazon EC2
Table of Contents
Amazon's Cloud provides a flexible platform to deploy Eden scalably.
The costs aren't fixed & can be difficult to predict, despite their calculator, but are competitive, especially in Singapore, which is a good base for the Asia Pacific region.
Regions & Zones
Amazon supports multiple Regions in order to provide a service closest to your users.
- Namespaces of Instances, Volumnes & Snapshots are unique only within a Region.
- Within each Region, there are a couple of Availability Zones to allow spreading the risk across different facilities.
- Volumes are located within a specific Availability Zone
- Bandwidth transfers are free within an Availability Zone
Instance Size
- The free starter 'micro' instance is flexible as it can run both 32-bit & 64-bit Operating Systems.
- The normal production 'small' instance can only run 32-bit.
- Larger production instances can only run 64-bit, so can't have the exact same image used.
Instance Persistence
- EBS-backed instances have persistent storage even whilst powered down, which is very useful.
- For DB I/O performance increase can stripe multiple EBS
- monitoring data available to see if this is the issue
- For DB I/O performance increase can stripe multiple EBS
AMI
- The community EBS Debian Squeeze-base i386 AMI can be turned into an Eden instance via the scripts found in Cherokee & PostgreSQL.
- Alternately, pre-built "Sahana Eden" AMIs are available in some regions (us-west). These just need to be configured via:
./configure-eden-cherokee-postgis.sh
Elastic IP
Each time you start an instance up, it will be assigned a new IP ('Public DNS') although this can be overcome using an Elastic IP
- Remember to set up Reverse DNS for your Elastic IP to be able to send emails reliably:
Authentication
SSH
This can provide an early stumbling block.
- Each instance created needs to start with a unique SSH keypair
- When setting up an instance, be sure to safely download the private key.
- In order to get the public key (needed by SecureCRT for instance) then you need to login using CLI & retrieve it:
ssh -l root -i private.pem <hostname>
cat ~/.ssh/authorized_keys
SecureCRT needs the private key storing as <filename> & the public as <filename.pub> (all on one line)
SSH will also need to be enabled in your Firewall policy (restrict the IP source, if possible)
Grow the Diskspace
The disk space on the initial image is just 1GB. This should be grown to 3Gb (don't just size the volume to 3Gb to start with as the image only uses 1Gb of it!)
- this is still within the 10Gb free tier.
You can do this using the AWS EC2 Console or else you can do it via the CLI
CLI Tools
To use any of the AWS CLI tools on your own machine to remotely manage instances, then you need to generate a unique X.509 Certificate per account. This can be done from the 'Security Credentials' page within your account.
CLI Management
There are extensive CLI tools available to manipulate your instances.
- Java CLI for Windows/Linux
- Python: http://libcloud.apache.org
CLI Script
Edit the settings as-indicated as you proceed through the script
# Settings for Instance
set EC2_URL=https://ec2.us-east-1.amazonaws.com
set ZONE=us-east-1c
set DEV=i-950895f1
set OLD=vol-31f5a35d
# Stop Host
ec2stop %DEV%
# Create a snapshot
ec2-create-snapshot %OLD%
# Record the snapshot ID
set SNAPSHOT=snap-63f89d08
# Create new volume from snapshot
ec2-create-volume -z %ZONE% --size 3 --snapshot %SNAPSHOT%
# Record the new Volume ID
set NEW=vol-a9c2a3c4
# Attach new volume as secondary
ec2-attach-volume -i %DEV% %NEW% -d /dev/sdb1
# Delete Snapshot (if no data in yet)
ec2-delete-snapshot %SNAPSHOT%
# Start Host
ec2start %DEV%
# Re-attach the Public IP
# Login
mkdir /mnt/data
echo '/dev/xvdb1 /mnt/data ext3 defaults,noatime 0 0' >> /etc/fstab
mount /mnt/data
resize2fs /dev/xvdb1
umount /mnt/data
shutdown -h now
# Unattach volumes
ec2-detach-volume -i %DEV% %OLD%
ec2-detach-volume -i %DEV% %NEW%
# Attach volume as boot
ec2-attach-volume -i %DEV% %NEW% -d /dev/sda1
# Attach old volume for /var/log
ec2-attach-volume -i %DEV% %OLD% -d /dev/sdb1
# OR Delete old volume
#ec2-delete-volume %OLD%
# Start Host
ec2start %DEV%
# Re-attach the Public IP
# Login
df -h
# Use the old partition for /var/log (to avoid DoS)
vi /etc/fstab
/dev/xvdb1 /var/log  ext3    noatime 0 0

mv /var/log /var/log_old
mkdir /var/log
mount /var/log
mv /var/log_old/* /var/log
rm -rf /var/log/bin/
rm -rf /var/log/boot/
rm -rf /var/log/dev/
rm -rf /var/log/etc/
rm -rf /var/log/home/
rm -rf /var/log/initrd.img
rm -rf /var/log/lib/
rm -rf /var/log/mnt/
rm -rf /var/log/media/
rm -rf /var/log/opt/
rm -rf /var/log/proc/
rm -rf /var/log/root/
rm -rf /var/log/sbin/
rm -rf /var/log/selinux/
rm -rf /var/log/srv/
rm -rf /var/log/tmp/
rm -rf /var/log/usr/
rm -rf /var/log/var/
rm -rf /var/log/vmlinuz
rm -rf /var/log_old
Add Swapfile
- You can add swap from a swap file :
dd if=/dev/zero of=/swapfile1 bs=1024 count=524288
mkswap /swapfile1
chown root:root /swapfile1
chmod 0600 /swapfile1
swapon /swapfile1
Make this persistent across reboots by adding the following to your /etc/fstab
/swapfile1 swap swap defaults 0 0
Install
- Copy the installation and configuration scripts -> install-eden-cherokee-postgis.sh and configure-eden-cherokee-postgis.sh into the launched instance.
wget http://eden.sahanafoundation.org/raw-attachment/wiki/InstallationGuidelines/Linux/Server/CherokeePostgreSQL/install-eden-cherokee-postgis.sh
chmod a+x install-eden-cherokee-postgis.sh
wget http://eden.sahanafoundation.org/raw-attachment/wiki/InstallationGuidelines/Linux/Server/CherokeePostgreSQL/configure-eden-cherokee-postgis.sh
chmod a+x configure-eden-cherokee-postgis.sh
- Run the install-eden-cherokee-postgis.sh script and delete it. [Note: This step takes about 10min - grab a coffee]
./install-eden-cherokee-postgis.sh
rm install-eden-cherokee-postgis.sh
Configure
Run configure-eden-cherokee-postgis.sh to configure the instance:
./configure-eden-cherokee-postgis.sh
Building AMIs for easier deployment
If your region doesn't yet have a Sahana AMI in, then it is easy to create one which allows easier deployment of future instances for both you & others. The only cost to you is a small amount of time to publish it & then using up your 1Gb Snapshot allowance within the free tier.
- Install the instance as-above
- Don't run the configure script
- Shutdown the EBS instance.
shutdown -h now
- Go to your aws console for the current region at | EC2 Console
- Select the debian instance you just prepared in the "Instances"
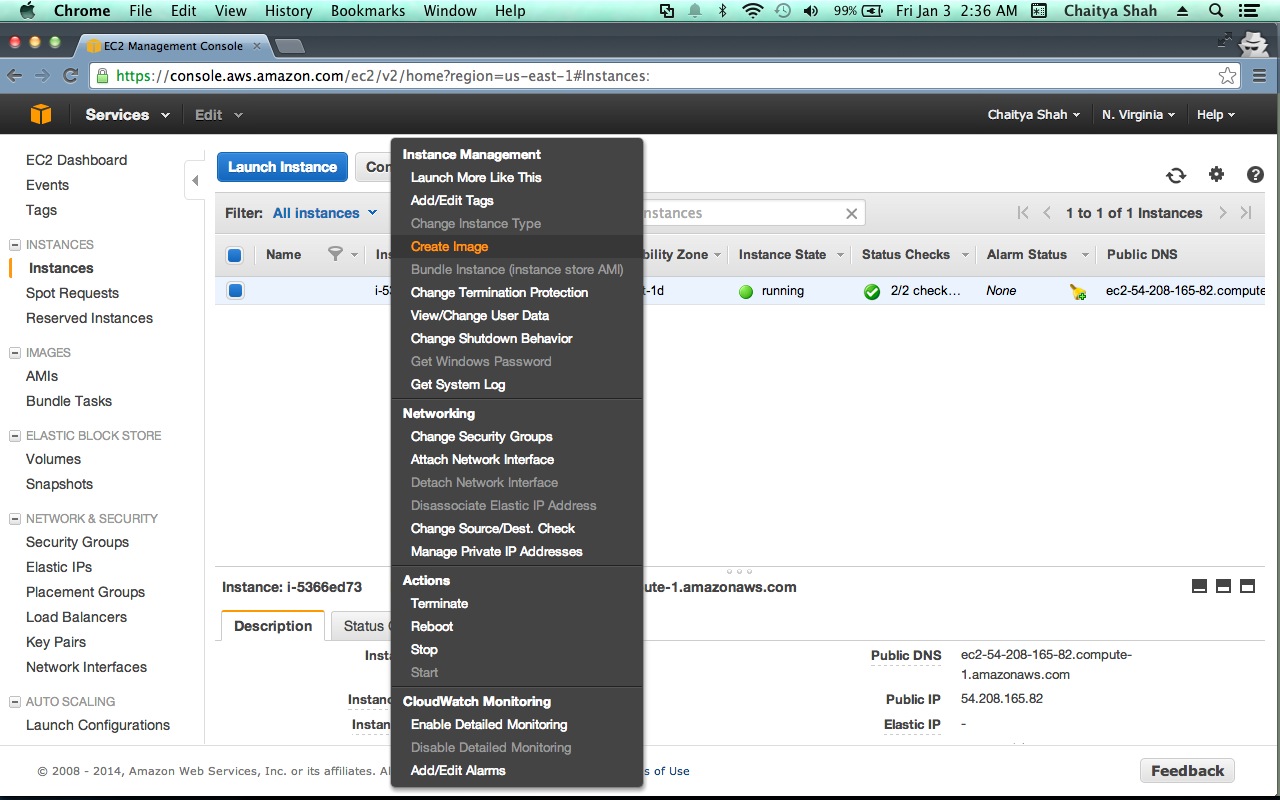
- Select " Create Image (EBS AMI) " in the "Instance Actions" drop down.
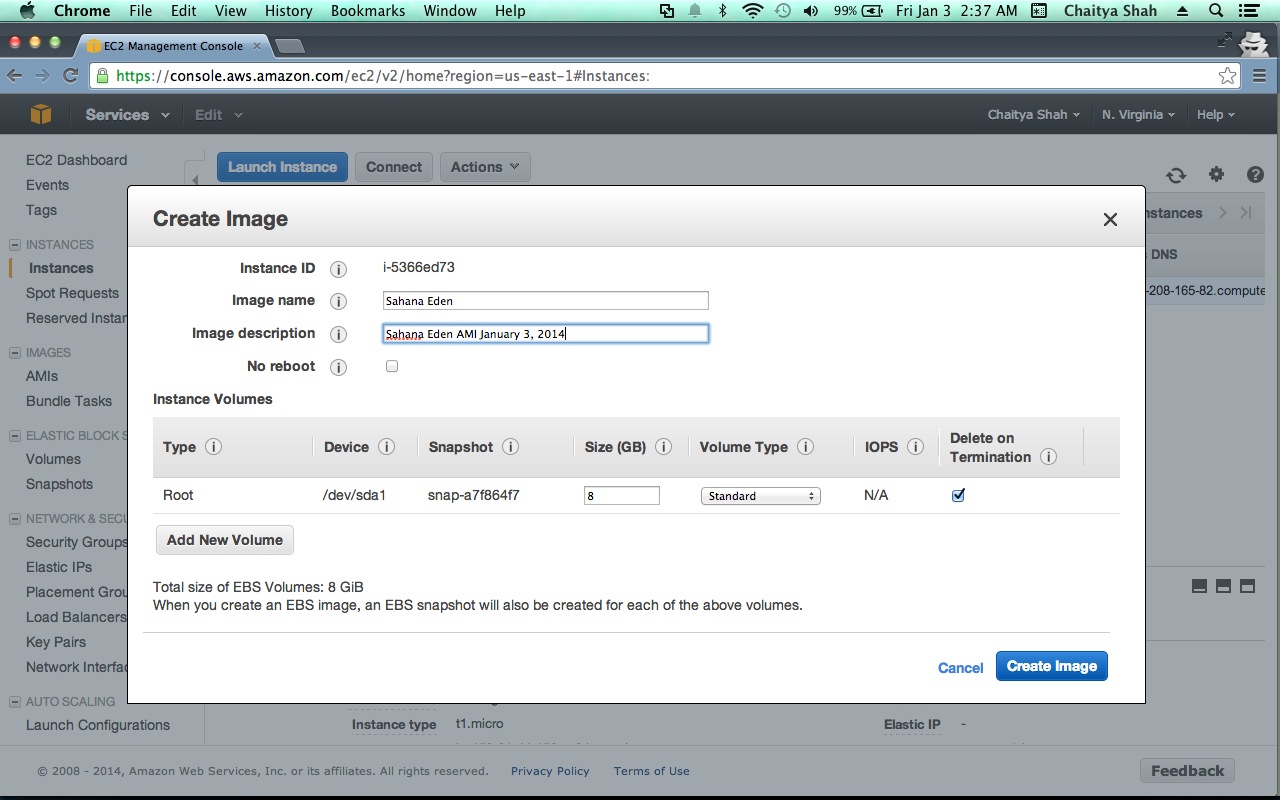
- Choose an Image name - Lets say - "Sahana Eden" and fill in a description.
- Click "Create this Image"
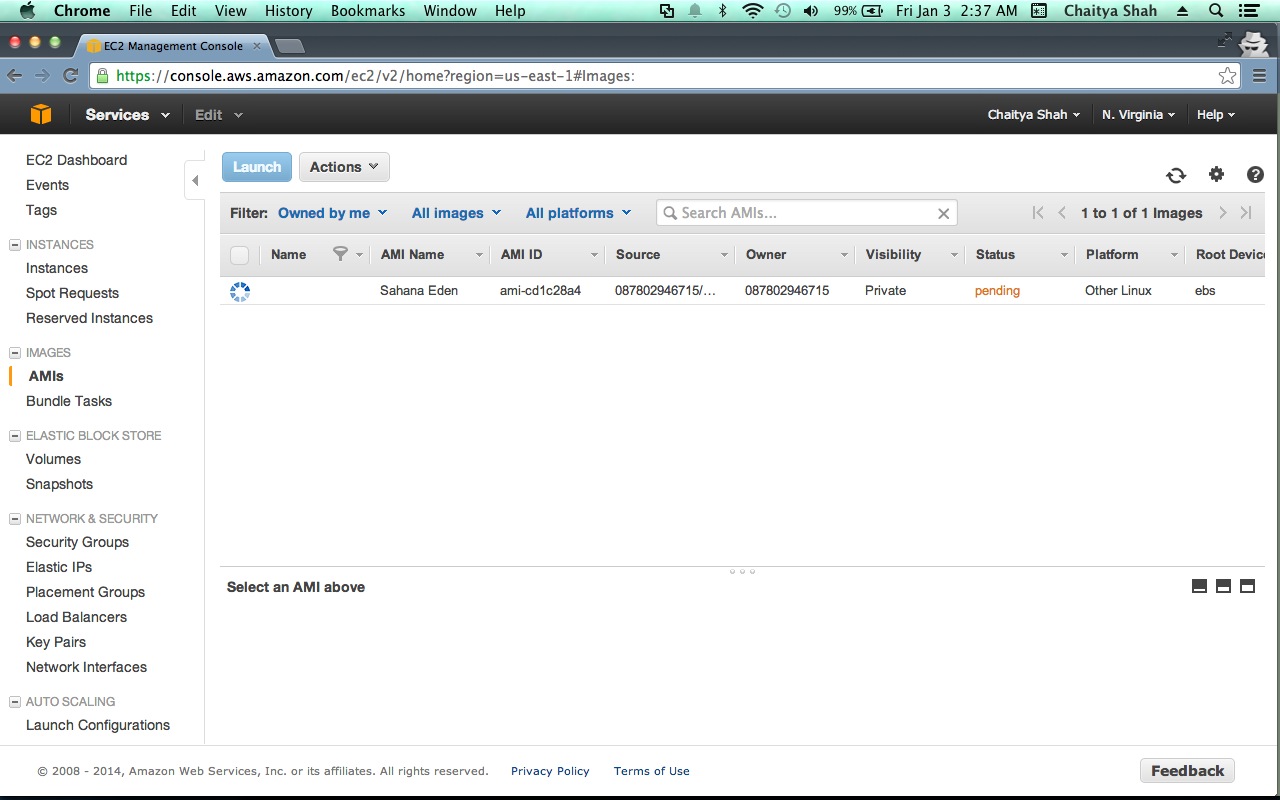
- Go to the "AMIS" menu and select "Owned by me" and "All Platforms" in the Viewing dropdown.
- Wait for about 5 minutes and hit refresh for the AMI you just built to appear.
- Select the AMI and click the Permissions button - Select public, to make the image public.
Keep Templates as EBS Volumes as this is cheaper than Snapshots
Next
Attachments (14)
- ami-built.png (156.9 KB ) - added by 12 years ago.
- ami-permissions.2.png (176.1 KB ) - added by 12 years ago.
-
orig-ami-built.png
(172.9 KB
) - added by 12 years ago.
lifeeth's original ami-built.png from 2 years ago
-
orig-create-image.png
(271.0 KB
) - added by 12 years ago.
lifeeth's original create-image.png from 2 years ago
-
orig-ami-permissions.png
(215.7 KB
) - added by 12 years ago.
lifeeth's original ami-permissions.png from 2 years ago
-
orig-create-image-config.png
(270.8 KB
) - added by 12 years ago.
lifeeth's original create-image-config.png from 2 years ago
- create-image-config.png (184.8 KB ) - added by 12 years ago.
- create-image.png (211.0 KB ) - added by 12 years ago.
- Dashboard.png (103.7 KB ) - added by 11 years ago.
- SelectAMI.png (94.4 KB ) - added by 11 years ago.
- SecurityGroup.png (70.1 KB ) - added by 11 years ago.
- UserData.png (59.3 KB ) - added by 11 years ago.
-
select_debian.png
(68.2 KB
) - added by 9 years ago.
selct debian OS
-
select_region.png
(12.8 KB
) - added by 9 years ago.
select region


