| Version 57 (modified by , 14 years ago) ( diff ) |
|---|
Table of Contents
Synchronization
Purpose
The Synchronization module allows the synchronization of data resources between Sahana Eden instances. Synchronization jobs can be configured to be run automatically in the background and at regular intervals, without disrupting the current operation of the sites.
This module is part of the site administration module, and requires administrator privileges to view or modify its configuration.
The synchronization module requires web2py revision 3566 (1.99.0) or newer.
Method
Overview
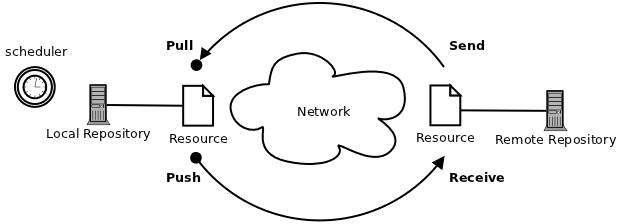
The synchronization process is controlled entirely by the local Sahana Eden instance.
The local Eden instance runs the scheduler process, and initiates the update requests when due, while the remote repository merely responds to these requests.
The local Eden instance first downloads the available updates from the remote repository (pull) and imports them into the local database, and then uploads all available updates from the local database to the remote repository (push).
Both pull and push are each a RESTful HTTP-request, using S3XML as data format.
Configuration
Checklist
Follow this checklist to configure synchronization:
- Check the Prerequisites
- Login as administrator at the remote site and register the local site
- Login as administrator at the local site and
- Start the worker process at the local site
Prerequisites
Both sites must have Sahana Eden installed and running. To avoid problems with different database structures, both Sahana Eden instances should always use the same version of the software.
Decide which one is the local and which the remote site. The remote site is typically a permanently and publicly accessible Sahana Eden instance, while the local site could be a protected site (e.g. behind a firewall), or with only temporary network access (e.g. a notebook). See Synchronization Overview to understand the situation, maybe note down for yourself or co-workers which instance is which.
While performing synchronization jobs, the local site must be able to establish a connection to the remote site over the network using HTTP.
If a proxy server is to be used for the HTTP connection, this can be configured in the Synchronization Settings (proxy authentication is currently not supported).
Check that both instances have the synchronization module enabled in models/000_config.py. If the sync section is missing from deployment_settings.modules, then add it as follows:
deployment_settings.modules = OrderedDict([

    ...

    # Add or uncomment this section, if it is missing or commented:
    ("sync", Storage(
            name_nice = T("Synchronization"),
            description = T("Synchronization"),
            restricted = True,
            access = "|1|",     # Only Administrators can see this module in the default menu & access the controller
            module_type = 0     # This item is handled separately for the menu
        )),

    ...

])
- go back to the Checklist
Synchronization Homepage
Login as administrator and open the Administration menu. In the left menu, you find the following entries:
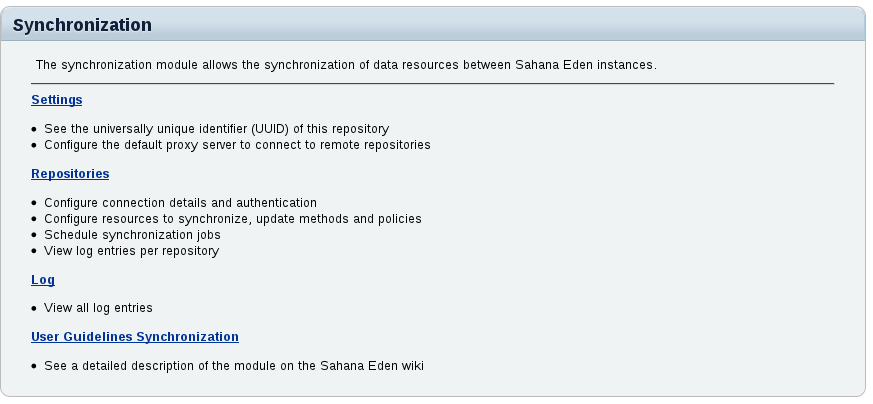
Click on Synchronization here to open the homepage of the Synchronization Module:
Synchronization Settings
Go to the Synchronization Homepage and click Settings to open this page:
This page shows you the UUID (universally unique identifier) of this repository. You will need this identifier to register the repository at the peer site (the local UUID to register at the remote site, and the remote UUID to register at the local site). The UUID is created during the first run of the Sahana Eden instance, and cannot be changed.
If needed, enter the complete URL of the proxy server (including port number if not 80) that is to be used when connecting to the remote site (this is only necessary at the local site). Click Save to update the configuration.
- go back to the Checklist
Repository Configuration
Go to the Synchronization Homepage and click Repositories. This will show you a list of all configured repositories:
To view and/or modify the configuration for a repository, clicking the Open button in the respective row in the list.
By clicking Add Repository, you can register a new repository:
Fill in the fields as follows:
Field Instructions registering the remote repository at the local site registering the local repository at the remote site Name Enter a name for the repository(for your own reference) required required URL Enter the URL of the repository required - Username Enter the username to authenticate at the repository required - Password Enter the password to authenticate at the repository required - Proxy Server Enter the URL of a proxy server to connect to the repository, if different from the Synchronization Settings fill in as needed - Accept Pushes check this if the repository is allowed to push updates - set as needed UUID Enter the UUID from the Synchronization Settings of the repository required required
You must register both the remote repository at the local site, and the local repository at the remote site.
- go back to the Checklist
Resource Configuration
Go to the Synchronization Homepage, click Repositories, then Open the repository you want to configure a resource for, and change to the Resources tab:
Fill in the fields as follows:
- go back to the Checklist
Synchronization Schedule
- tbw
- go back to the Checklist
Worker
The scheduled synchronization jobs are performed by a separate asynchronous web2py worker process at the local site.
To start the worker process, open a shell on the local server, change into the web2py home directory and run:
python web2py.py -K eden -Q
(replace "eden" with the name of your Sahana Eden application if necessary)
In more advanced configurations you may want to run this command as a daemon process, e.g. under Linux by:
nohup python web2py.py -K eden -Q >/dev/null 2>&1 &
- go back to the Checklist
Synchronization Log
Go to the Synchronization Homepage and click Log. This shows you a list of all prior log entries for all repositories.
If you instead want to see the log entries only for a particular repository, go to the Synchronization Homepage, click Repositories, then Open the respective repository configuration and go to the Log tab:
Note: the newest entries are shown on top of the list.
Click on Details for a log entry to see the complete entry:
Read the entries as follows:
Item Explanation Date/Time Date and time of the transaction Repository Name of the repository synchronized with Resource Name Name of the resource synchronized Mode Transaction mode (pull or push) and direction of transmission (incoming or outgoing) Action Action performed to resolve problems (if any) Result Result of the transaction Remote Error True if there was an error at the remote site Message The log message
Attachments (10)
-
sync1.png
(23.7 KB
) - added by 14 years ago.
Synchronization Overview
-
sync_menu.png
(3.1 KB
) - added by 14 years ago.
Synchronization Menu
-
sync_homepage.png
(30.4 KB
) - added by 14 years ago.
Synchronization Homepage
-
sync_repository_log.png
(80.5 KB
) - added by 14 years ago.
Repository Log
-
sync_repository_log_entry.png
(12.3 KB
) - added by 14 years ago.
Repository Log Entry
-
sync_repository_add.png
(13.3 KB
) - added by 14 years ago.
Repository Registration
-
sync_repository.png
(23.9 KB
) - added by 14 years ago.
Repository Registry
-
sync_config.png
(16.1 KB
) - added by 14 years ago.
Synchronization Settings
-
sync_schedule_add.png
(28.7 KB
) - added by 14 years ago.
Synchronization Schedule
-
sync_resource_add.png
(40.9 KB
) - added by 12 years ago.
Resource Configuration
Download all attachments as: .zip


