
| Version 70 (modified by , 14 years ago) ( diff ) |
|---|
Table of Contents
Synchronization
Purpose
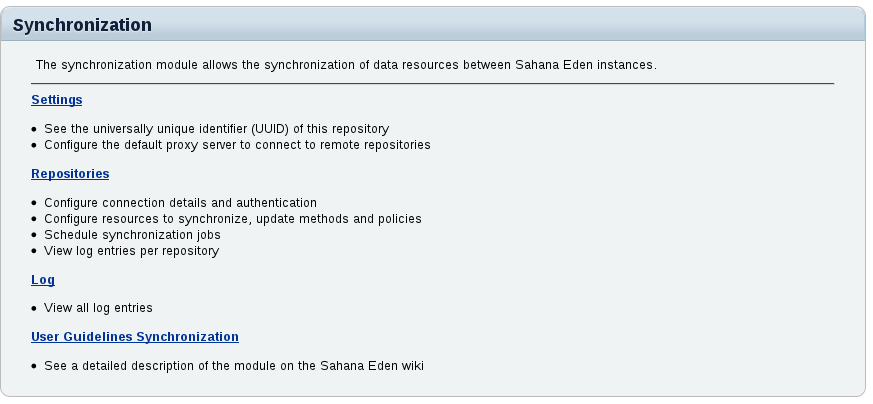
The Synchronization module allows the synchronization of data resources between Sahana Eden instances. Synchronization jobs can be configured to be run automatically in the background and at regular intervals, without disrupting the current operation of the sites.
This module is part of the site administration module, and requires administrator privileges to view or modify its configuration.
The synchronization module requires web2py revision 3566 (1.99.0) or newer.
Method
Overview
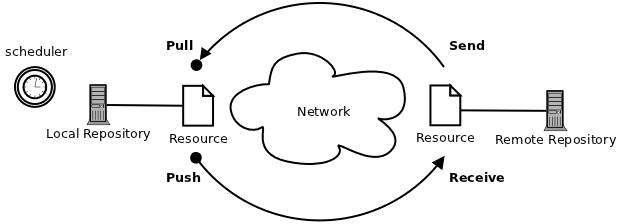
The synchronization process is controlled entirely by the local Sahana Eden instance.
The local Eden instance runs the scheduler process, and initiates the update requests when due, while the remote repository merely responds to these requests.

The local Eden instance first downloads the available updates from the remote repository (pull) and imports them into the local database, and then uploads all available updates from the local database to the remote repository (push).
Both pull and push are each a RESTful HTTP-request, using S3XML as data format.
Configuration
Checklist
Follow this checklist to configure synchronization:
- Check the Prerequisites
- Make sure the remote site is up and running, and available over network
- Login as administrator at the local site and
- Start the worker process at the local site
Prerequisites
Both sites must have Sahana Eden installed and running. To avoid problems with different database structures, both Sahana Eden instances should always use the same version of the software.
Decide which one is the local and which the remote site. The remote site is typically a permanently and publicly accessible Sahana Eden instance, while the local site could be a protected site (e.g. behind a firewall), or with only temporary network access (e.g. a notebook). See Synchronization Overview to understand the situation, maybe note down for yourself or co-workers which instance is which.
While performing synchronization jobs, the local site must be able to establish a connection to the remote site over the network using HTTP.
If a proxy server is to be used for the HTTP connection, this can be configured in the Synchronization Settings (proxy authentication is currently not supported).
Check that both instances have the synchronization module enabled in models/000_config.py. If the sync section is missing from deployment_settings.modules, then add it as follows:
deployment_settings.modules = OrderedDict([

    ...

    # Add or uncomment this section, if it is missing or commented:
    ("sync", Storage(
            name_nice = T("Synchronization"),
            description = T("Synchronization"),
            restricted = True,
            access = "|1|",     # Only Administrators can see this module in the default menu & access the controller
            module_type = 0     # This item is handled separately for the menu
        )),

    ...

])
It is important that the system clocks in both sites are synchronized with each other, which can best be achieved by synchronizing both sites with the same NTP service.
- go back to the Checklist
Synchronization Homepage
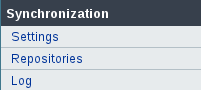
Login as administrator and open the Administration menu. In the left menu, you find the following entries:

Click on Synchronization here to open the homepage of the Synchronization Module:

Synchronization Settings
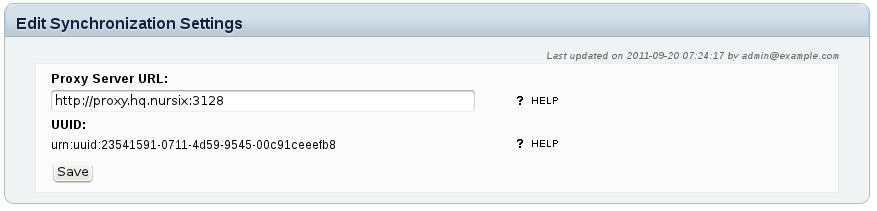
Go to the Synchronization Homepage and click Settings to open this page:

This page shows you the UUID (universally unique identifier) of this repository. You will need this identifier to register the repository at the peer site (the local UUID to register at the remote site, and the remote UUID to register at the local site). The UUID is created during the first run of the Sahana Eden instance, and cannot be changed.
If needed, enter the complete URL of the proxy server (including port number if not 80) that is to be used when connecting to the remote site (this is only necessary at the local site). Click Save to update the configuration.
- go back to the Checklist
Repository Configuration
Go to the Synchronization Homepage and click Repositories. This will show you a list of all configured repositories:

To view and/or modify the configuration for a repository, clicking the Open button in the respective row in the list.
By clicking Add Repository, you can register a new repository:

Fill in the fields as follows:
Field Instructions registering the remote repository at the local site registering the local repository at the remote site Name Enter a name for the repository(for your own reference) required required URL Enter the URL of the repository (base URL of the Sahana Eden instance) required - Username Enter the username to authenticate at the repository required - Password Enter the password to authenticate at the repository required - Proxy Server Enter the URL of a proxy server to connect to the repository, if different from the Synchronization Settings fill in as needed - Accept Pushes check this if the repository is allowed to push updates - set as needed UUID Enter the UUID from the Synchronization Settings of the repository required required
Normally, you only have to register the remote repository at the local site. This will automatically send a request to the remote site to register the local repository. Please make sure that the remote repository is up and running and reachable over network. If this registration request fails, you will see a warning message requesting you to manually register the local repository at the remote site. Otherwise you can find an entry in the synchronization log confirming that the registration was successful.
- go back to the Checklist
Resource Configuration
Go to the Synchronization Homepage, click Repositories, then Open the repository you want to configure a resource for, and change to the Resources tab:

Fill in the fields as follows:
| Field | Instructions | Example |
| Resource Name | Fill in the name of the master table of the resource. Details can be found in the documentation for the data model of your Sahana Eden application | req_req |
| Mode | Select the synchronization mode you wish to activate - pull, push or both. See Synchronization Overview to understand the mode | pull and push |
| Strategy | Choose the import methods you wish to allow for the synchronization of this resource | create, update, delete |
| Update Policy | Choose in which situation records shall be updated, see explanations below | NEWER |
| Conflict Policy | Choose in which situation records shall be updated in case of conflicts, see explanations below | NEWER |
Update Policy
If a record has been modified in one of the repositories, then the synchronization process has to decide whether to update the other repository with the new data or not. For this decision you can define a policy:
| Policy | Meaning |
| THIS | Always update the remote repository with the local version of the record (overwrite remote updates) |
| NEWER | Update both repositories to the newest version of the record (keep the newer data) |
| MASTER | Update the record on either side only if the other side has originated the record (keep the master data) |
| OTHER | Always update the local repository with the remote version of the record (overwrite local updates) |
Usually, you would choose "NEWER" here unless you have a good reason to do otherwise.
Conflict Policy
If a record has been modified both in the local repository and the remote repository since the last synchronization time, then this is called a conflict situation, in which two concurrent record updates are available at the same time. You can define a policy for which of the updates to apply, similar to the Update Policy.
If you don't know what to select here, it is reasonable to choose the same option as for the Update Policy.
Policy Transfer
In most situations, you would want both repositories to apply the same policies. This is the default behavior - the policies from the local site are reported to the remote site during the synchronization, and are applied there as well (THIS and OTHER are replaced by the respective opposite at the remote site, of course).
If you for some reason need to define different policies at the remote site, then you have to configure the same resource at the remote site as well, and choose the policies explicitly.
- go back to the Checklist
Synchronization Schedule
Go to the Synchronization Homepage, click Repositories, then Open the repository configuration you want to schedule a synchronization job for and change to the Schedule tab. If there are already jobs configured for this repository, you will see a list of those jobs. Otherwise (or by clicking Add Job), you get to this form:

With every Job, all resources configured for this repository will be synchronized.
Fill in the fields as follows:
Field Instructions Example Enabled Set to True if the job shall actually be run, or set False to disable the job True Start Time Select date and time for the first run of this job (UTC) 2011-09-21 08:30 End Time Select date and time after which the job shall not be run anymore (UTC) 2012-09-21 08:30 Repeat n times Select how often the job shall be run, set to 0 to set no limit 0 Run every Select the time interval after which to repeat the job 5 minutes Timeout Set a maximum time after which to abort the action 600 seconds
If you need to switch between jobs (e.g. for maintenance periods, low-traffic periods), you can set up multiple schedules, and disable/enable them as needed
To consider:
You should choose meaningful time interval and timeout settings: the more resources are to be synchronized, the longer it will take (in this regard, also note that THIS- and OTHER-policies will always exchange all records in a resource, thus taking significantly longer).
How many record have to be exchanged per each run depends on the average update frequency and the time internal between synchronizations: e.g. if there are on average 100 record updates per minute, and you set a 2-minute interval, then there would be 200 records on average to be transmitted every run. The import rate on a small server has been tested at on average 18 records/second, which means, the synchronization process would take around 11 seconds in this case. To be on the safe side, choose a timeout value at least 10 times as high as that - e.g. 120 seconds.
Note that the network traffic arising from synchronization does not mainly depend on the frequency of synchronization, but on the record update rate at the sites. Smaller synchronization intervals would increase the traffic only slightly, but reduce the rate of conflicts and the risk of network-related problems. However, too small intervals (below the update rate of the site) may cause unnecessary network traffic with just empty transmissions.
- go back to the Checklist
Worker
The scheduled synchronization jobs are performed by a separate asynchronous web2py worker process at the local site.
To start the worker process, open a shell on the local server, change into the web2py home directory and run:
python web2py.py -K eden -Q
(replace "eden" with the name of your Sahana Eden application if necessary)
In more advanced configurations you may want to run this command as a daemon process, e.g. under Linux by:
nohup python web2py.py -K eden -Q >/dev/null 2>&1 &
- go back to the Checklist
Synchronization Log
Go to the Synchronization Homepage and click Log. This shows you a list of all prior log entries for all repositories.
If you instead want to see the log entries only for a particular repository, go to the Synchronization Homepage, click Repositories, then Open the respective repository configuration and go to the Log tab:

Note: the newest entries are shown on top of the list.
Click on Details for a log entry to see the complete entry:

Read the entries as follows:
Item Explanation Date/Time Date and time of the transaction Repository Name of the repository synchronized with Resource Name Name of the resource synchronized Mode Transaction mode (pull or push) and direction of transmission (incoming or outgoing) Action Action performed to resolve problems (if any) Result Result of the transaction Remote Error True if there was an error at the remote site Message The log message
Attachments (10)
-
sync1.png
(23.7 KB
) - added by 14 years ago.
Synchronization Overview
-
sync_menu.png
(3.1 KB
) - added by 14 years ago.
Synchronization Menu
-
sync_homepage.png
(30.4 KB
) - added by 14 years ago.
Synchronization Homepage
-
sync_repository_log.png
(80.5 KB
) - added by 14 years ago.
Repository Log
-
sync_repository_log_entry.png
(12.3 KB
) - added by 14 years ago.
Repository Log Entry
-
sync_repository_add.png
(13.3 KB
) - added by 14 years ago.
Repository Registration
-
sync_repository.png
(23.9 KB
) - added by 14 years ago.
Repository Registry
-
sync_config.png
(16.1 KB
) - added by 14 years ago.
Synchronization Settings
-
sync_schedule_add.png
(28.7 KB
) - added by 14 years ago.
Synchronization Schedule
-
sync_resource_add.png
(40.9 KB
) - added by 12 years ago.
Resource Configuration
Download all attachments as: .zip
