Use Cases
Table of Contents
User Stories
During the Event
During an event (or disaster) following are the key workflows:
- Creating a new Event (e.g. SW Floods and Landslides 2017)
- Creating and Editing Needs
- Committing to Needs
- Entering and Editing 4W Updates
- Entering Situational Updates
Creating a new Event
An event (or disaster) is created in the platform is created in the system when the real-life situation has resulted in organisations reporting needs and response activities. This event allows needs/activities and other related information to be attributed to that particular event.
- The System Administrator (UN RCO)
- Creates a new event under the “More”>”Disasters” option
- Enters the title for the overall event
- Can select a “disaster type”
- Can provide a “start” date (onset)
- Can include the affected districts
- Saves the record
- Can enter “Situational Updates” to show the event on the Homepage
- Creates a new event under the “More”>”Disasters” option
Creating and Editing Needs
In the HCT Phase, HCT members/Response agencies supply needs information through both periodic updates and in ad-hoc, as-required manner.
A need is a requirement (of items including food, clothing, skills, cash for work etc.) caused by an immediate or prolonged disaster.
In ShaRe Hub, each need is entered as a “row”. Each row is determined by the location (DS Division, GN Division), affected people and required response (“item”). The overall form as a whole reflects the “Group” of needs as determined by the location (Province and District).
The user organisation:
- Logs into the platform
- Selects “Needs” - “Create” from the menu bar
- Needs Entry form is opened:
- Enters the relevant information into the first fields (Disaster/Province/District/Date if different to date that the entry is occuring/Summary of Needs/Issue-Cause) note: Organisation is automatically filled with the user’s organisation as determined at registration.
- Enters one or more “needs entries” (one needs entry per row as defined by differences in location, number or type of affected people, and the required response (“items”)
- Completes any other relevant fields in the field (uploading of documents such as Letters of Request from authorities, showing government verification and contact details on the ground, delivery addresses)
- Saves the entry and is taken to the Needs Summary Table.
- To edit a need, the user:
- Opens the Needs Summary Table
- Selects “Edit” button in the column to the left of the appropriate row
- Selects the pencil icon on the right side to edit the row
Note: Only the organisation that created a need and the system administrator can edit a need.
Committing to Needs
Organisations can commit to deliver some or all of the items required, and/or reach some or all of the people affected within that overall need.
The user organisation:
- Logs into the platform
- Selects “Needs - View”, opening the Needs Summary Table
- The user selects the “Commit” button next to the desired need in the table
- Opens commitment form (activities/4W entry form) with the relevant information automatically copied from the needs form into the same fields in the commitment form:
- Disaster
- Location data
- Summary of Needs
- Issue/Cause
- The specific row of the need that is being committed to.
- Issue/Cause
- The user selects the “edit” option on the right of the need information (row)
- The user changes the values of fields related to the response commitment they desire to make. These include:
- People Affected / Number
- Item Category / Item / Unit / Quantity
- Any other relevant information above or below the needs row (including contact details, addresses for delivery etc)
- Note:
- If the user commits to the total amount of people/items in the needs entry, then the need is “Fully committed”.
- If the user commits to a smaller amount of the people/items in the needs entry, then the need is “Partially committed”. Other users can commit to these needs to fill the gaps.
- Users can cancel their commitments if required, and the system will revise the figures accordingly.
- Users can mark the response as “complete” once the real-life need is met. For commitments with multiple organisations responding, this requires communication with the organisation that entered the need before marking the need as “complete”.
- The user changes the values of fields related to the response commitment they desire to make. These include:
Entering and Editing 4W Activities
In the HCT Phase, HCT members/Response agencies supply information on activities through both periodic updates and in ad-hoc, as-required manner.
Entering 4W activities uses the same form as making a commitment; however, the 4W activity is entered without an associated “need” within the platform and so does not have pre-inputted data in the form.
The user organisation:
- Logs into the platform
- Selects “4W” - “Create” from the menu bar
- 4W Activity Entry form is opened:
- Enters the relevant information into the first fields (Disaster/Implementing Partners/Donors/Province/District/Date if different to date that the entry is occuring/Summary of Needs/Activities) note: Organisation is automatically filled with the user’s organisation as determined at registration.
- Enters one or more “Activity entries” (one activity entry per row as defined by differences in location, number or type of beneficiaries, and the response conducted)
- Completes any other relevant fields in the field (uploading of documents such as Letters of Request from authorities, contact details on the ground, delivery addresses)
- Saves the entry and is taken to the 4W Activities SummaryTable.
- To edit a 4W Activity, the user:
- Opens the 4W Activities Summary Table
- Selects “Edit” button in the column to the left of the appropriate row
- Selects the pencil icon on the right side to edit the row
Note: Only the organisation that created an activity and the system administrator can edit a need.
Entering Situational Update
RCO to update
Before the Disaster
Registering an HCT Organization
- Registering (creating) a user profile
- Registering an organisation
Registering (creating) a user profile
The new user:
- Opens the ShaReHub Platform in their browser
- Clicks on “Register” on the top-right of the page
- Completes the required fields (First Name/Last Name/Email/Password/Language/Organisation/Register as staff or volunteer
- Selects “Register” button at bottom of the page
- The user is then taken to the homepage, from which they can log-in.
Note: If the user’s organisation does not have a profile created in ShaRe Hub, the user must contact the administrator (humanitarian.lk@one.un.org) to have the organisation profile created.
Note: The user will not immediately have user permissions and must have these approved by the system administrator (humanitarian.lk@one.un.org).
Note: The “Profile” section consists of 13 tabs for the user to complete, containing information on qualifications, skills, contact details and other areas. The area is not compulsory to complete for platform use, but allows for users to register further information that may help in mobilising and coordinating response.
Registering an Organisation
Note: The general practice is the same for all users. However, this guidance has been written considering the initial user group of HCT agencies.
The new user:
- Logs into the ShaRe Hub
RCO TO COMPLETE
Use Case Diagrams
To refresh on the actors refer to the section on Stakeholders.
Import 4W updates (HCT Orgs)
- A single form can present features to:
- download a 4W sheet with login user's Org specific data for a selected event
- upload the 4W spreadsheet with updated data
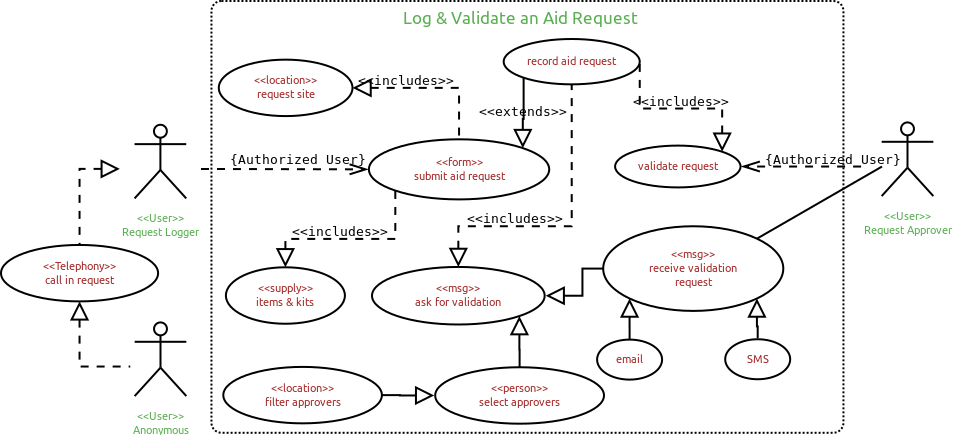
Call Center (EOC) hotline service
- Anonymous user calls the ShaRe hotline to report a request
- Authorized Request Logger receives a request for aid
- if
- anonymous user - records all contact information to ensure its not a prank call
- known (trusted) or from own organization, then contact details unnecessary
- it is logged using the request type specific form
- includes identifying predefined item kits/packages and request site (location)
- if
- Upon submission of the request, the system prompts Request Logger to
- select designated Request Approvers from the area
- submit an email and/or SMS requesting for verification and validation
- Approver confirms the request to be authentic
- clicks on approval URL in the Email or SMS
- log into the system to click approve
- Upon approval the request is confirmed and made visible for processing (i.e. commit and deliver)
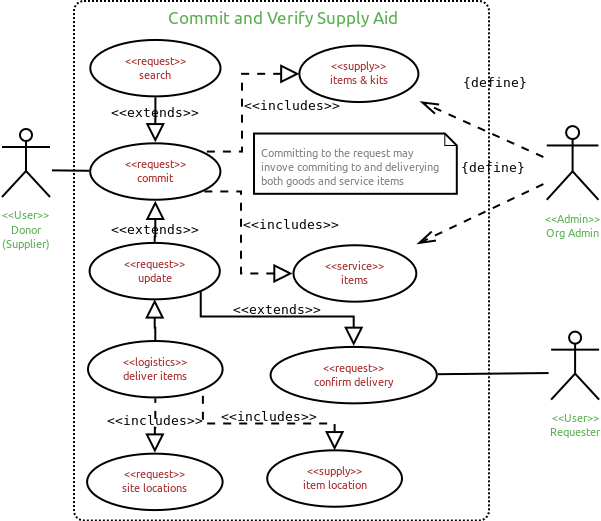
Commit to request, supply and verify delivery
- Org Admin defines the
- supply items, kits, and packages
- locations for collecting the items (i.e. drop-off or assembly point)
- Donor (Supplier) filters through list of requests to
- search for specific request (i.e. by location or category)
- commit to the request and specifies the items (goods & service) and quantities
- arranges for gathering and delivering the items to the requested location
- Upon delivery and receipt of all items, the Requester updates the status = complete
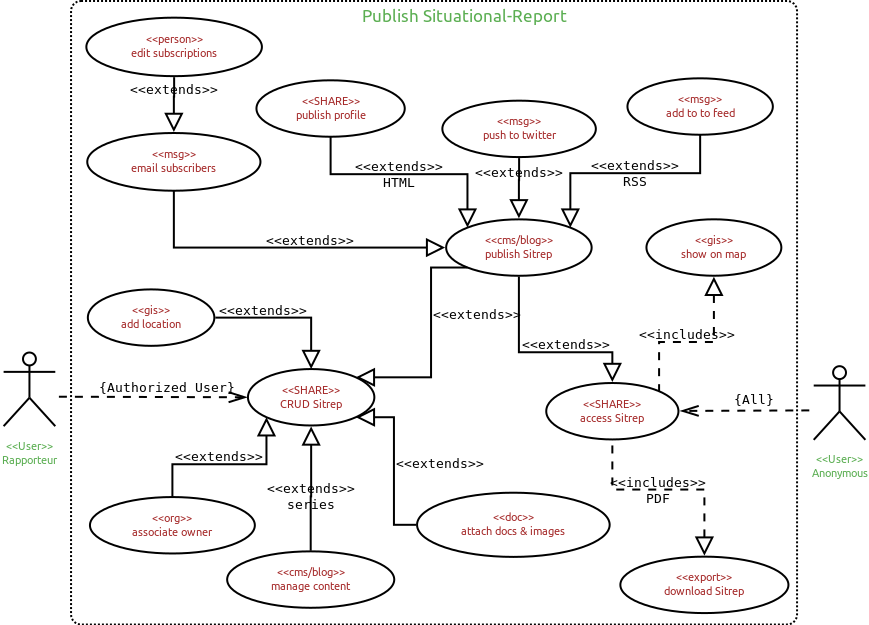
Publish Sitreps
- Rapporteur has permissions to create, read, update, or delete a sitrep
- access the Sitrep form to create new or edit existing)
- if new - relate to event (e.g floods 2017)
- add/edit content with sections for
- title (headline)
- paragraphs (with markups)
- reference URL(s)
- uploads
- multiple photos
- multiple documents (PDF, DOC, XSL, ...)
- select a location to relate the sitrep to (e.g. an Lx name - province, district, ... or a specific location)
- select an organization or default to Rapporteur's organization
- submit form to publish sitrep
- profile - create or update the styled html page
- email headline and link to the profile (attach PDF file)
- twitter - push headline with link to profile page
- RSS - update the RSS feed
- access the Sitrep form to create new or edit existing)
- Anonymous user (i.e. anyone)
- access the sitrep through the menu
- selects either the list view or map view (i.e. hide or show map)
- see a summary of the stirep with more ... option
- clicks on more to navigate to profile page to read entire sitrep
- clicks on download control to receive a PDF copy of the sitrep
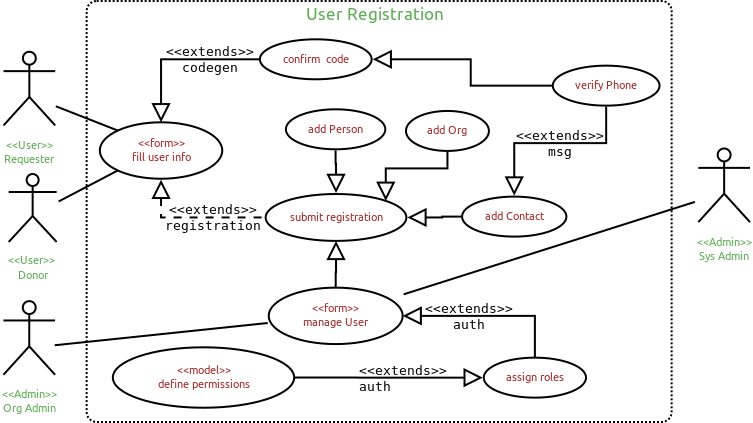
Registering and Managing Users
Optional processes:
- SHARE registration system
- offers a form for users to register their name, organization, contact details (phone & email mandatory)
- system generate a random 4 digit code -
- is sent via SMS to registering user
- user enters code to authenticate their phone
- without phone authentication user cannot be granted permissions
and a Another
Attachments (5)
-
Supply_Aid.png
(69.9 KB
) - added by 8 years ago.
supply and deliver aid items
-
Register_Users2.png
(67.0 KB
) - added by 8 years ago.
register user
-
Request_Aid.png
(82.0 KB
) - added by 8 years ago.
aid request
-
Publish_Sitreps.png
(101.6 KB
) - added by 8 years ago.
sitrep
-
Upload_4W.png
(53.3 KB
) - added by 7 years ago.
upload 4W
Download all attachments as: .zip


