| Version 87 (modified by , 7 years ago) ( diff ) |
|---|
Use Cases
Table of Contents
User Stories
During the Event
During an event (or disaster) following are the key workflows:
- Creating a new Event (e.g. SW Floods and Landslides 2017)
- Creating and Editing Needs
- Committing to Needs
- Entering and Editing 4W Updates
- Entering Situational Updates
Creating a new Event
An event (or disaster) is created in the platform is created in the system when the real-life situation has resulted in organisations reporting needs and response activities. This event allows needs/activities and other related information to be attributed to that particular event.
- The System Administrator (UN RCO)
- Creates a new event under the “More”>”Disasters” option
- Enters the title for the overall event
- Can select a “disaster type”
- Can provide a “start” date (onset)
- Can include the affected districts
- Saves the record
- Can enter “Situational Updates” to show the event on the Homepage
- Creates a new event under the “More”>”Disasters” option
Creating and Editing Needs
In the HCT Phase, HCT members/Response agencies supply needs information through both periodic updates and in ad-hoc, as-required manner.
A need is a requirement (of items including food, clothing, skills, cash for work etc.) caused by an immediate or prolonged disaster.
In ShaRe Hub, each need is entered as a “row”. Each row is determined by the location (DS Division, GN Division), affected people and required response (“item”). The overall form as a whole reflects the “Group” of needs as determined by the location (Province and District).
The user organisation:
- Logs into the platform
- Selects “Needs” - “Create” from the menu bar
- Needs Entry form is opened:
- Enters the relevant information into the first fields (Disaster/Province/District/Date if different to date that the entry is occuring/Summary of Needs/Issue-Cause) note: Organisation is automatically filled with the user’s organisation as determined at registration.
- Enters one or more “needs entries” (one needs entry per row as defined by differences in location, number or type of affected people, and the required response (“items”)
- Completes any other relevant fields in the field (uploading of documents such as Letters of Request from authorities, showing government verification and contact details on the ground, delivery addresses)
- Saves the entry and is taken to the Needs Summary Table.
- To edit a need, the user:
- Opens the Needs Summary Table
- Selects “Edit” button in the column to the left of the appropriate row
- Selects the pencil icon on the right side to edit the row
Note: Only the organisation that created a need and the system administrator can edit a need.
Committing to Needs
Organisations can commit to deliver some or all of the items required, and/or reach some or all of the people affected within that overall need.
The user organisation:
- Logs into the platform
- Selects “Needs - View”, opening the Needs Summary Table
- The user selects the “Commit” button next to the desired need in the table
- Opens commitment form (activities/4W entry form) with the relevant information automatically copied from the needs form into the same fields in the commitment form:
- Disaster
- Location data
- Summary of Needs
- Issue/Cause
- The specific row of the need that is being committed to.
- Issue/Cause
- The user selects the “edit” option on the right of the need information (row)
- The user changes the values of fields related to the response commitment they desire to make. These include:
- People Affected / Number
- Item Category / Item / Unit / Quantity
- Any other relevant information above or below the needs row (including contact details, addresses for delivery etc)
- Note:
- If the user commits to the total amount of people/items in the needs entry, then the need is “Fully committed”.
- If the user commits to a smaller amount of the people/items in the needs entry, then the need is “Partially committed”. Other users can commit to these needs to fill the gaps.
- Users can cancel their commitments if required, and the system will revise the figures accordingly.
- Users can mark the response as “complete” once the real-life need is met. For commitments with multiple organisations responding, this requires communication with the organisation that entered the need before marking the need as “complete”.
- The user changes the values of fields related to the response commitment they desire to make. These include:
Entering and Editing 4W Activities
In the HCT Phase, HCT members/Response agencies supply information on activities through both periodic updates and in ad-hoc, as-required manner.
Entering 4W activities uses the same form as making a commitment; however, the 4W activity is entered without an associated “need” within the platform and so does not have pre-inputted data in the form.
The user organisation:
- Logs into the platform
- Selects “4W” - “Create” from the menu bar
- 4W Activity Entry form is opened:
- Enters the relevant information into the first fields (Disaster/Implementing Partners/Donors/Province/District/Date if different to date that the entry is occuring/Summary of Needs/Activities) note: Organisation is automatically filled with the user’s organisation as determined at registration.
- Enters one or more “Activity entries” (one activity entry per row as defined by differences in location, number or type of beneficiaries, and the response conducted)
- Completes any other relevant fields in the field (uploading of documents such as Letters of Request from authorities, contact details on the ground, delivery addresses)
- Saves the entry and is taken to the 4W Activities SummaryTable.
- To edit a 4W Activity, the user:
- Opens the 4W Activities Summary Table
- Selects “Edit” button in the column to the left of the appropriate row
- Selects the pencil icon on the right side to edit the row
Note: Only the organisation that created an activity and the system administrator can edit a need.
Entering Situational Update
RCO to update
Before the Disaster
Registering an HCT Organization
Oxfam, as a member of the HCT, is keen on using the system with registering their facilities, supply items, kits, & packages, and managing user accounts of their own employees to submit requests and manage the logistics of supplying goods and services for each request.
- Oxfam Country Manager: Ms. Sheryl Temple
- opens the ShaRe application in her browser
- clicks on Contact Us offered through the Help menu (/eden/default/contact)
- fills in her name, email, organization name, and a short message requesting to join ShaRe
- then clicks the submit button
- immediately, she receives an automatic email saying that someone will contact her before 24 hours
- ShaRe SysAdmin
- receives an email from the system with the Oxfam message
- then forwards the email to the HCT members to authenticate
- receives the green-light to grant Oxfam permission to register their Organization and manage their data
- replies to the original email, asking that Oxfam register a new user (/eden/default/user/register)
- Oxfam IT Manager
- create a new user
- first name = Shaolin
- last name = Temple
- email = shatemp@oxfam.org.lk
- password = changeme
- clicks the submit button; the system automatically sends an emai
- to new user shatemp@oxfam.org.lk
- and to the ShaRe SysAdmin
- create a new user
- ShaRe SysAdmin
- after login, accesses the new user account sets the role = Org_Admin
- the system sends an email to: shatemp@oxfam.org.lk saying account is active
- Oxfam IT Manager
- after login to the system, goes to complete the
- Personal data (/eden/default/person/update)
- Contact details (/eden/default/person/#/contacts) to add a phone number
- after login to the system, goes to complete the
Use Case Diagrams
To refresh on the actors refer to the section on Stakeholders.
Import 4W updates (HCT Orgs)
- A single form can present features to:
- download a 4W sheet with login user's Org specific data for a selected event
- upload the 4W spreadsheet with updated data
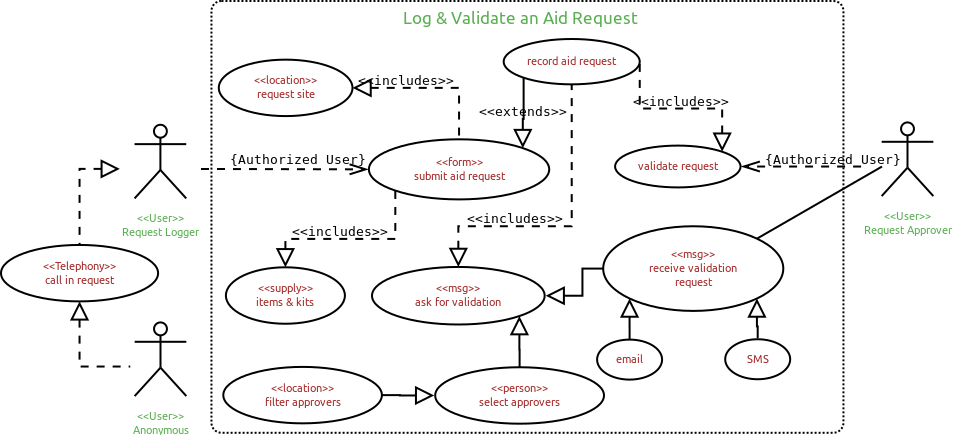
Call Center (EOC) hotline service
- Anonymous user calls the ShaRe hotline to report a request
- Authorized Request Logger receives a request for aid
- if
- anonymous user - records all contact information to ensure its not a prank call
- known (trusted) or from own organization, then contact details unnecessary
- it is logged using the request type specific form
- includes identifying predefined item kits/packages and request site (location)
- if
- Upon submission of the request, the system prompts Request Logger to
- select designated Request Approvers from the area
- submit an email and/or SMS requesting for verification and validation
- Approver confirms the request to be authentic
- clicks on approval URL in the Email or SMS
- log into the system to click approve
- Upon approval the request is confirmed and made visible for processing (i.e. commit and deliver)
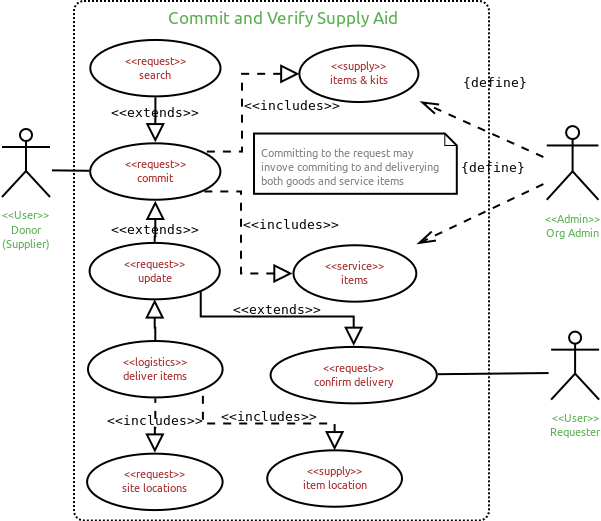
Commit to request, supply and verify delivery
- Org Admin defines the
- supply items, kits, and packages
- locations for collecting the items (i.e. drop-off or assembly point)
- Donor (Supplier) filters through list of requests to
- search for specific request (i.e. by location or category)
- commit to the request and specifies the items (goods & service) and quantities
- arranges for gathering and delivering the items to the requested location
- Upon delivery and receipt of all items, the Requester updates the status = complete
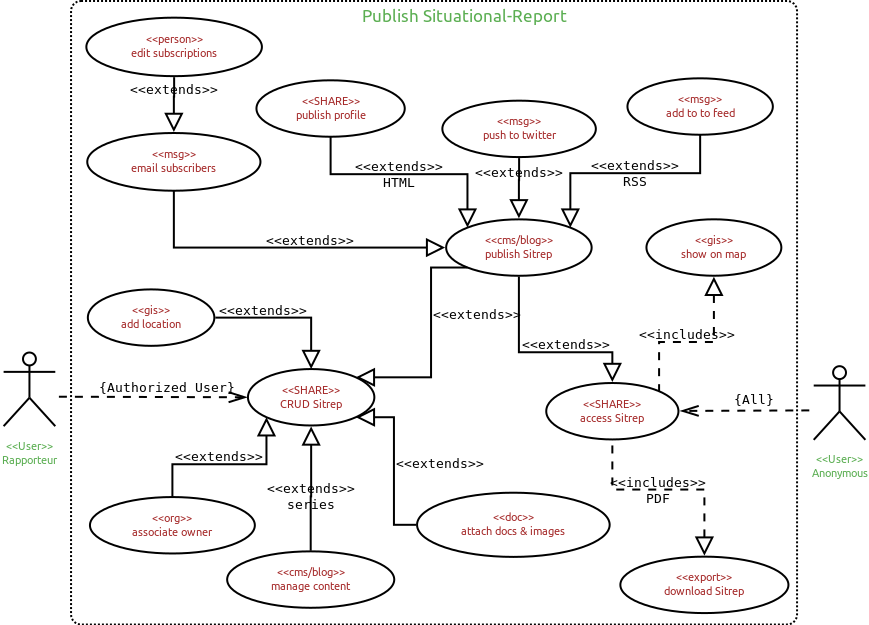
Publish Sitreps
- Rapporteur has permissions to create, read, update, or delete a sitrep
- access the Sitrep form to create new or edit existing)
- if new - relate to event (e.g floods 2017)
- add/edit content with sections for
- title (headline)
- paragraphs (with markups)
- reference URL(s)
- uploads
- multiple photos
- multiple documents (PDF, DOC, XSL, ...)
- select a location to relate the sitrep to (e.g. an Lx name - province, district, ... or a specific location)
- select an organization or default to Rapporteur's organization
- submit form to publish sitrep
- profile - create or update the styled html page
- email headline and link to the profile (attach PDF file)
- twitter - push headline with link to profile page
- RSS - update the RSS feed
- access the Sitrep form to create new or edit existing)
- Anonymous user (i.e. anyone)
- access the sitrep through the menu
- selects either the list view or map view (i.e. hide or show map)
- see a summary of the stirep with more ... option
- clicks on more to navigate to profile page to read entire sitrep
- clicks on download control to receive a PDF copy of the sitrep
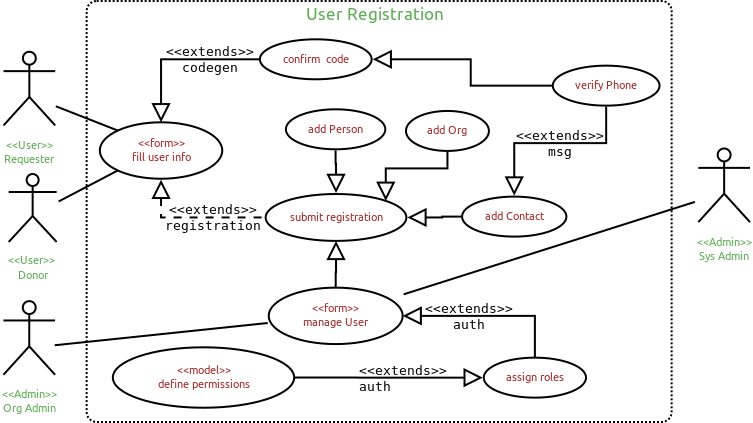
Registering and Managing Users
Optional processes:
- SHARE registration system
- offers a form for users to register their name, organization, contact details (phone & email mandatory)
- system generate a random 4 digit code -
- is sent via SMS to registering user
- user enters code to authenticate their phone
- without phone authentication user cannot be granted permissions
and a Another
Attachments (5)
-
Supply_Aid.png
(69.9 KB
) - added by 8 years ago.
supply and deliver aid items
-
Register_Users2.png
(67.0 KB
) - added by 7 years ago.
register user
-
Request_Aid.png
(82.0 KB
) - added by 7 years ago.
aid request
-
Publish_Sitreps.png
(101.6 KB
) - added by 7 years ago.
sitrep
-
Upload_4W.png
(53.3 KB
) - added by 7 years ago.
upload 4W
Download all attachments as: .zip


